Getting Started
SaaS Cancellation FlowsHow Raaft works
Connecting your Payment Processor


Technical Set Up
Creating Flows
What is a FlowRetention OffersMultiple active FlowsFAQsUsing the Raaft App
DashboardReportingCustomers At-riskZapier IntegrationWhat is a Flow
Raaft Flows replace your current cancellation experience with a customized user experience aimed at understanding why your subscriber is canceling and providing options to retain them.
Steps
Your retention flow has 6 basic steps, and you set them in any order you want by dragging and dropping in the “Steps” menu to the right of the flow editor.
In each step you can set the copy by directly changing and style the text in the card.
Each step has a configuration menu with two tabs:
- Content: In this tab you can set the configuration and display of each step card, such as teh card type, list items, offer configurations, etc.
- Logic: This is where you set the step that will be shown next when the user decides to continue in the flow.
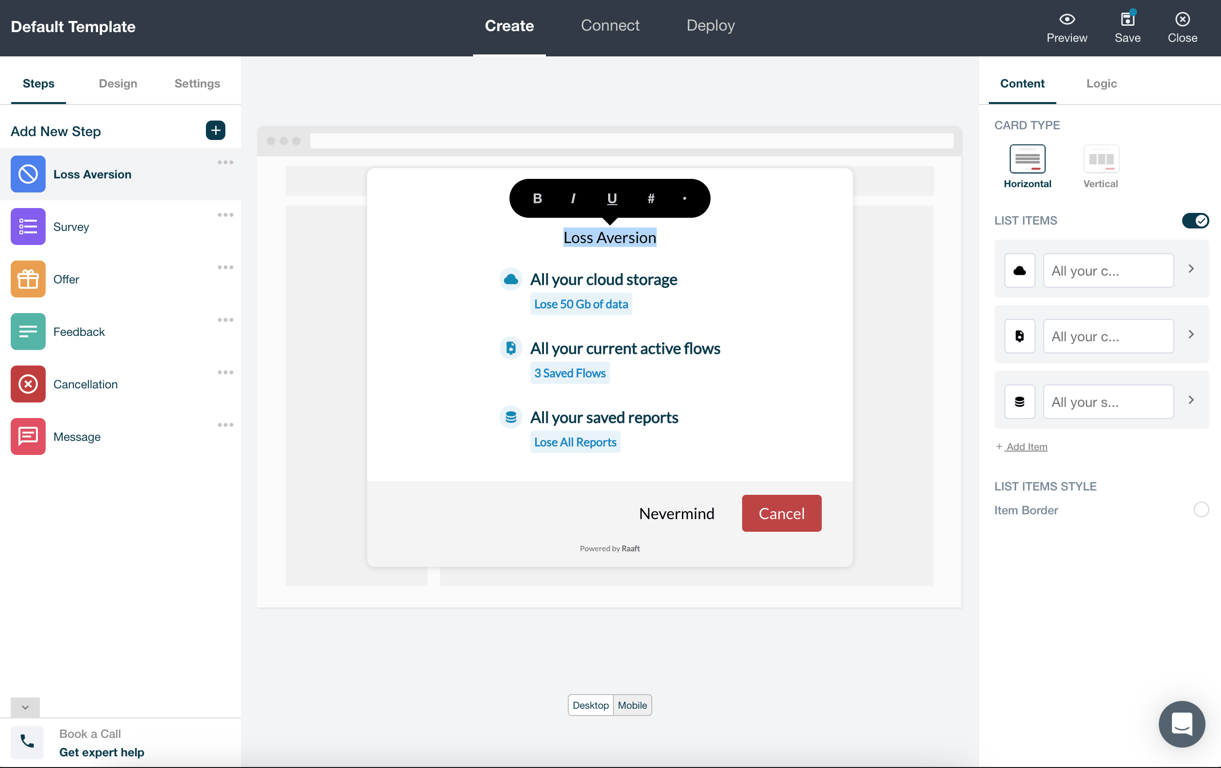
Loss Aversion
This step is most commonly used as the initial pop up modal your customer sees when they first click your 'Cancel' button.
You can highlight to users what they’ll stand to lose if they go ahead with the cancellation.
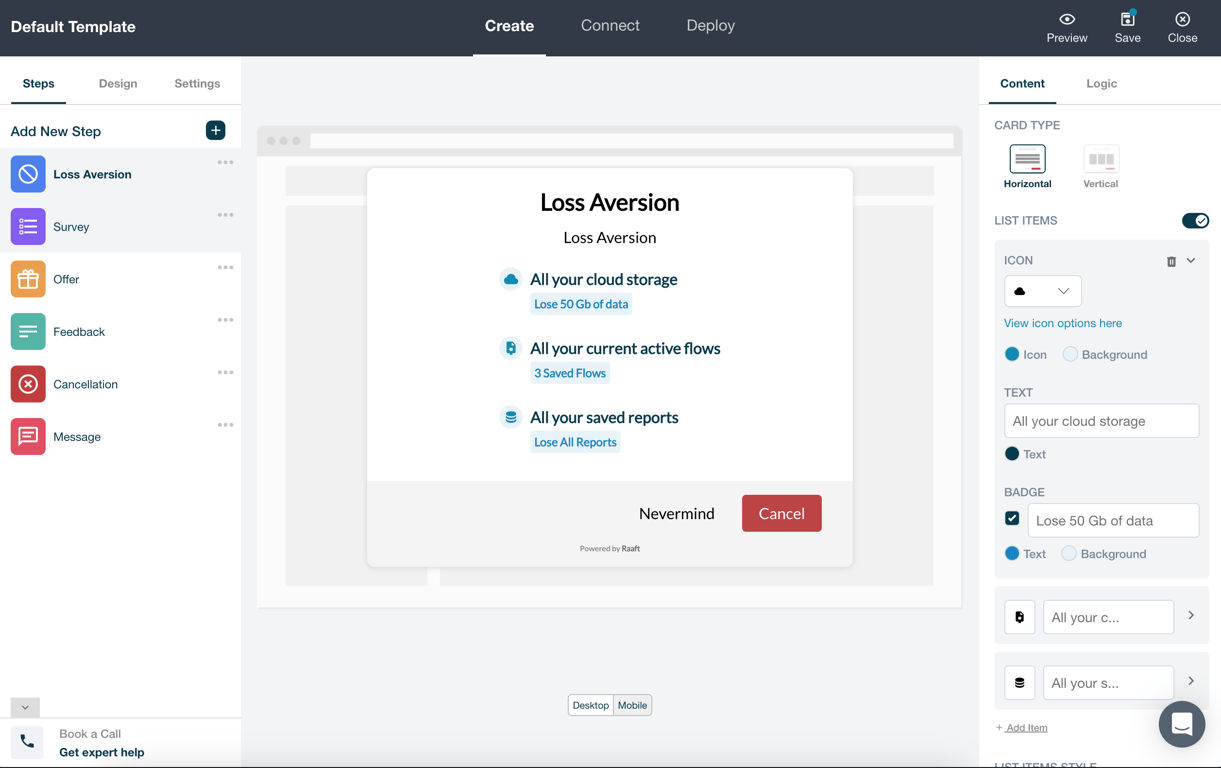
For the Loss Aversion step, the “Content” tab allows you to perform the following actions:
- Card type: You can change between “Horizontal” or “Vertical”. This will affect how the list items are display. The “Horizontal” option will display the items as a list, while the “Vertical” option will display in a grid style where each row has three items.
- List Items: You can set multiple customisable list items, where you can set icons, copy, text and background colours, and a badge with extra information.
- List item border: For added list items customisation you can set a border around each item in the colour you select
The “Logic” tab for the Loss Aversion step allows only to select the step that will follow when user decides to continue to go through the rest of the flow.
Survey
The survey lets customers select their primary reason for cancellation.
In this step you can select what churn reasons by category (Product, Needs, Pricing, Support or Other) you want to offer your customers. You can also set custom options to match your brand's voice.
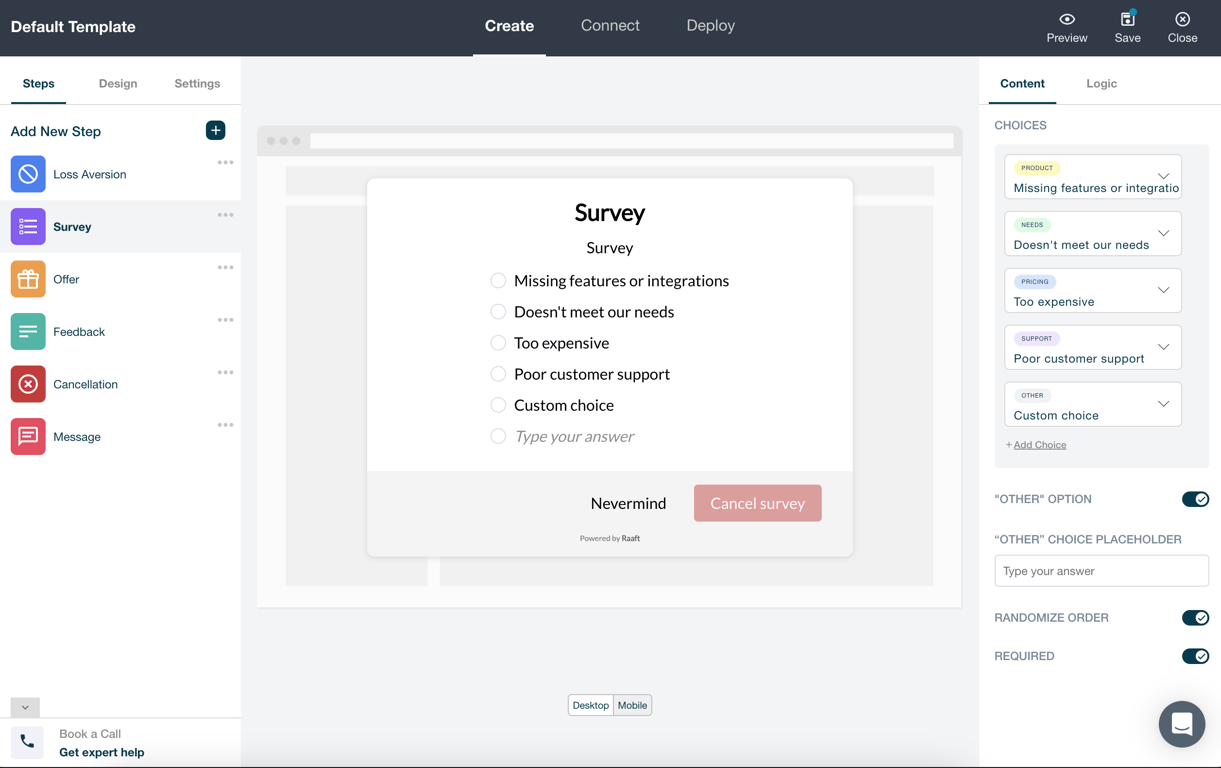
In the “Content” tab you have a few configuration options:
- you can set a text field that allows your customer to type their reason
- you can randomize the order of the options to avoid having users always selecting the same first option
- you can make it a required step to ensure your user always selects an option
The “Logic” tab for the Survey step is the most complex one. In here you not select the default next step for the survey, but you can select specific steps to go to for each option. This means that each option can lead to different steps.
In each condition, multiple options can be selected for the same step.
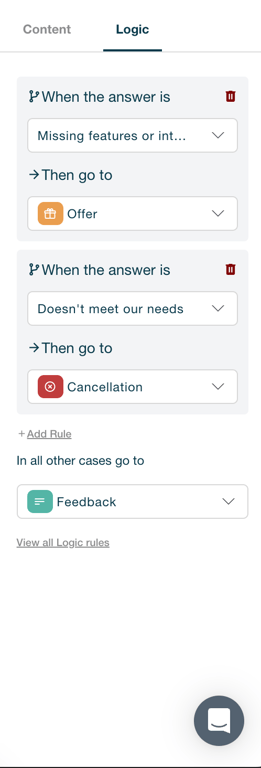
If no option is attributed to a specific step, then that offer automatically redirects to the survey next step (defined under “In all other cases go to”).
Additional you can view and edit the entire “Logic” of the flow by clicking “View all Logic rules”.
Offers
Offers are your opportunity to address customer’s reasons for cancellation.
Each survey option can be connected to a response in an attempt to direct the customer away from cancellation.
You can make multiple offers at the moment of cancellation:
- Discount Coupons
- Subscription Pauses
- Switch Plans
- Custom Link
- Call Me
You can configure each offer’s appearance to maximize the chance of retention.
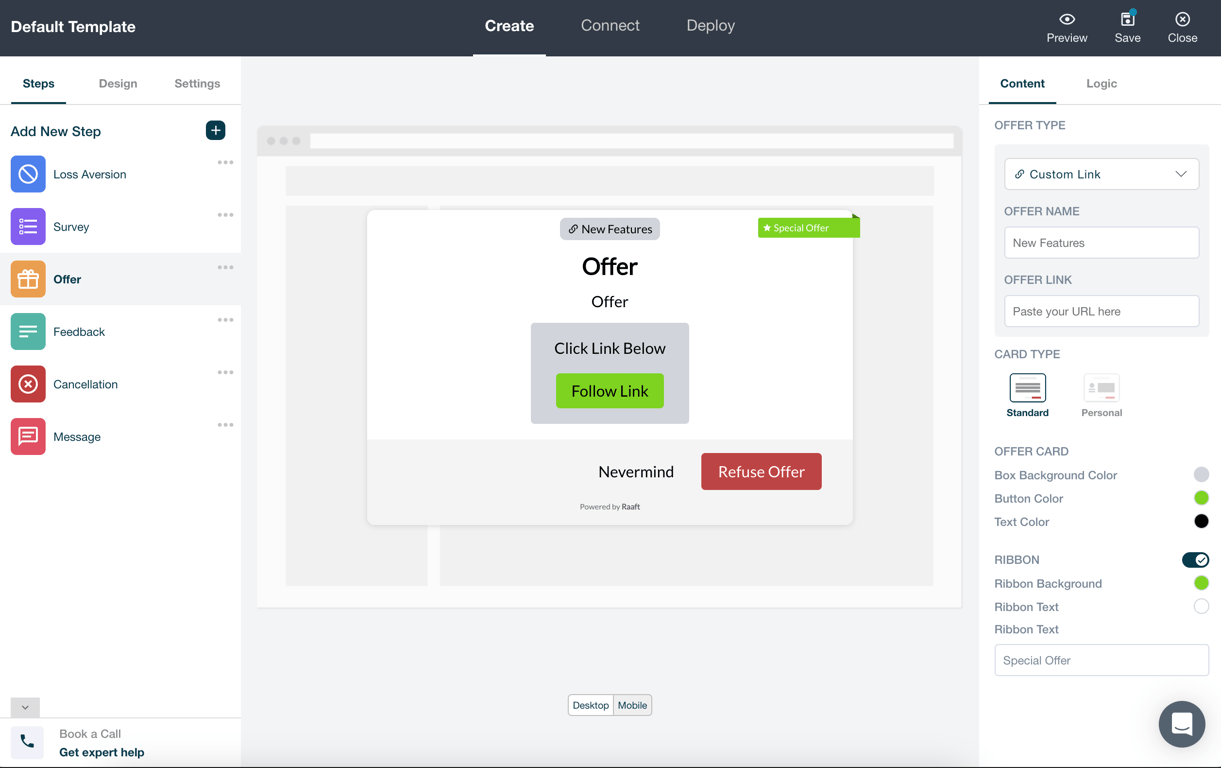
In the “Content” tab for each offer step you’ll find:
- an offer name
- the card type: It can be selected the “Standard”, that only displays the copy and the offer card, or it can be personal, where a foto of a collaborator will be added to the left of the offer card, along with some text below that photo
- you can define the offer card background and button styles
- a ribbon can be added to the top right corner of the popup
The “Logic” tab, like the Loss Aversion step, allows to select the next step to go to in case the offer is rejected.
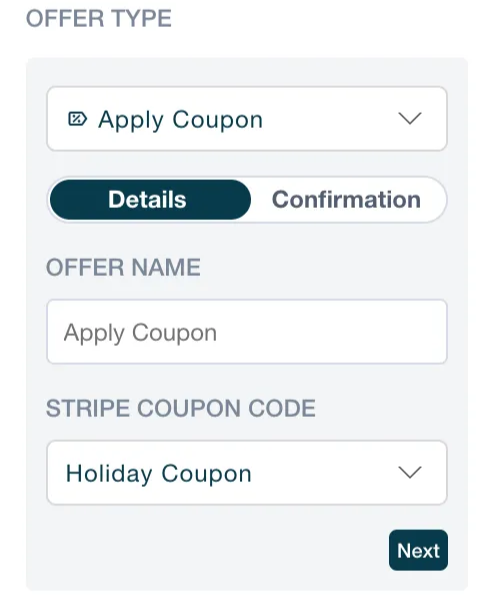
With the exception of the “Custom Link” offer, every offer has a confirmation step. You can view this step by clicking the “Details/Confirmation” toggle or the “Next” button.
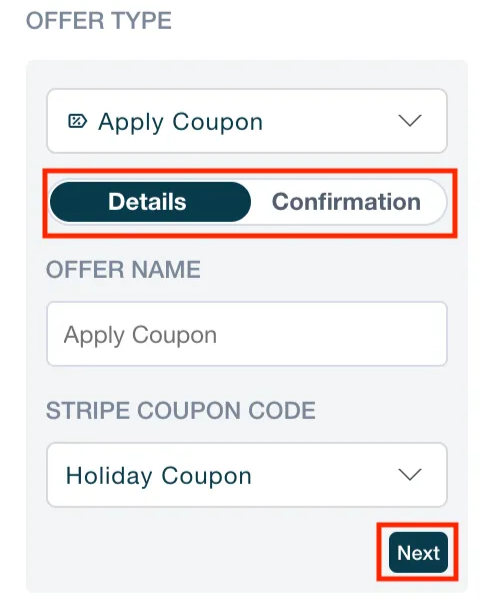
In here, you’ll be able to configure the confirmation step for a specific offer step.
The confirmation step is a popup that your users will see after accepting an offer. This let them now the offer was applied successfully.
The only configuration you’ll need to do in this step is define what happens when the user clicks on the popup button.
Apply Coupon
Allows you to offer a discount coupon to your subscribers to prevent them from cancelling.
Warning: A user can only use a coupon per flow. If for any reason a user tries to use another coupon in the same flow, that offer won’t be shown.
The setup for an offer of the coupon type is very simple, you only have to select a coupon from the available coupons list, and you’re done.
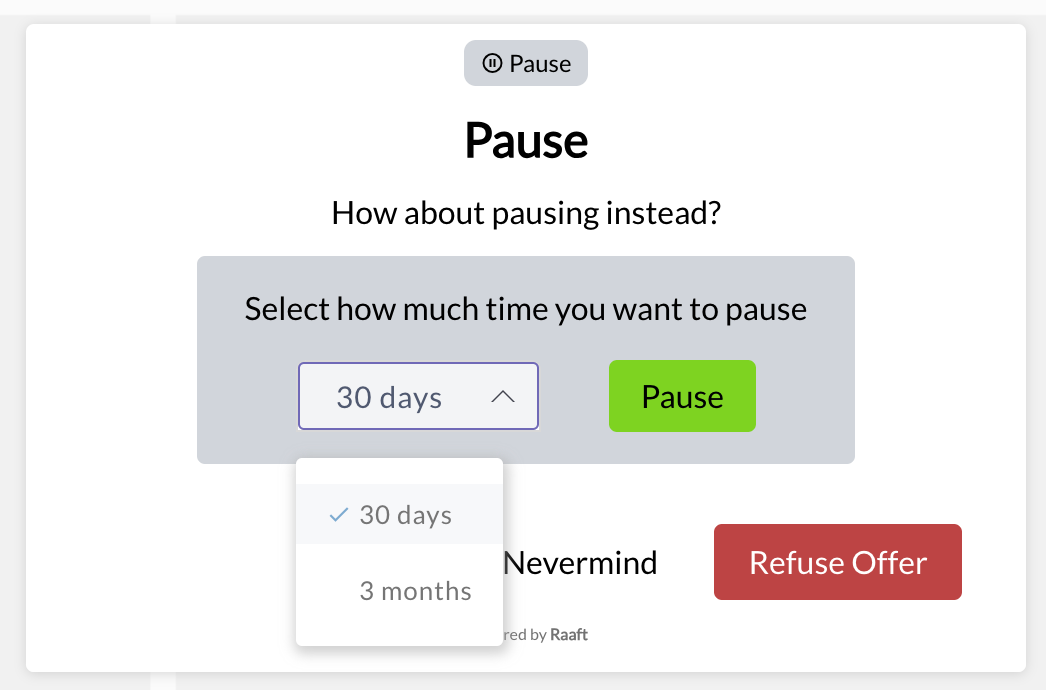
Pause Subscription
This offer allows your user to pause the subscription payments for a set amount of time.
In the setup of this offer you can offer multiple pause options, if you wish so. This means that your user will be able to select one pause option from the dropdown with all the options you set.
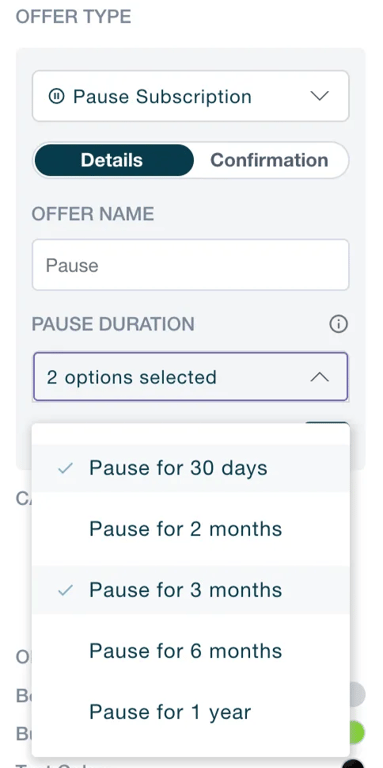
If you only set one available option, no dropdown will be displayed to the user, only a button like the Apply Coupon offer.
If you allow the user to select between multiple options, this is what will be shown:
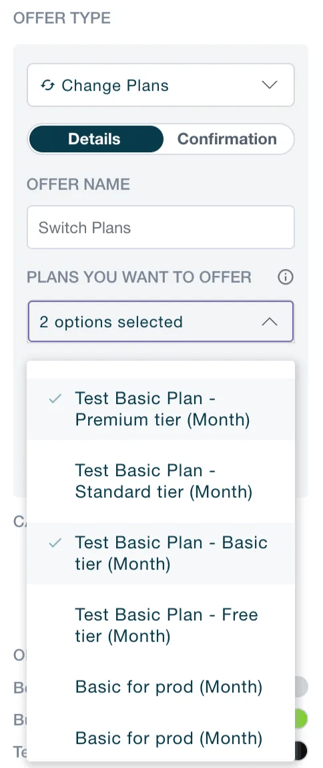
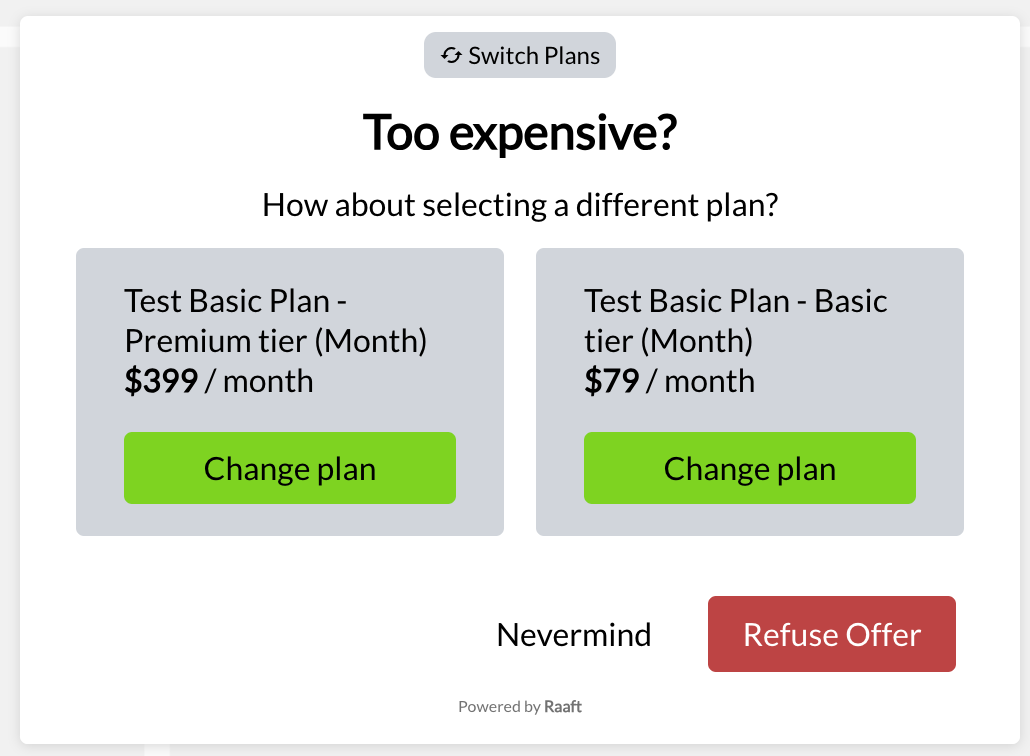
Switch Plans
You can give the option for your users to change to a different plan instead of cancelling.
In this offer type you can allow your users to choose between multiple plans, from the available list.
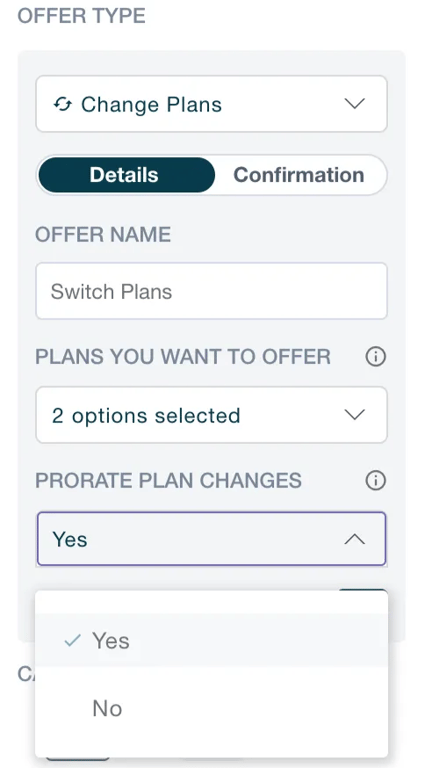
You’ll also need to define the plan change proration behaviour. This means that if you select “Yes” in the proration behaviour, any changes to the subscription will be immediate, and credits or extra charges will be applied. If you select “No”, then the changes will only be applied at the start of the next billing period.
You’ll be able to provide a list of available plans to your users, where each plan card has a customisable content.
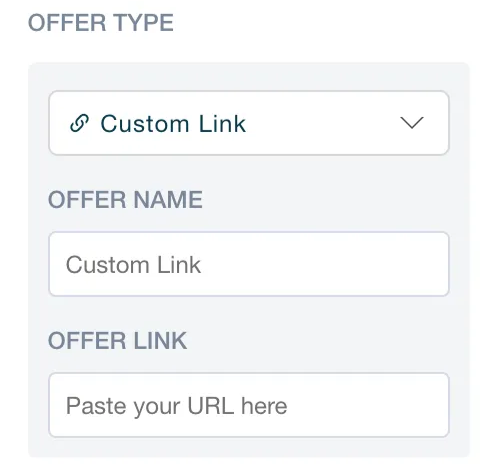
Custom Link
This offer redirects your user to a page you define, being a page with incoming features, a page to schedule a call with support, etc.
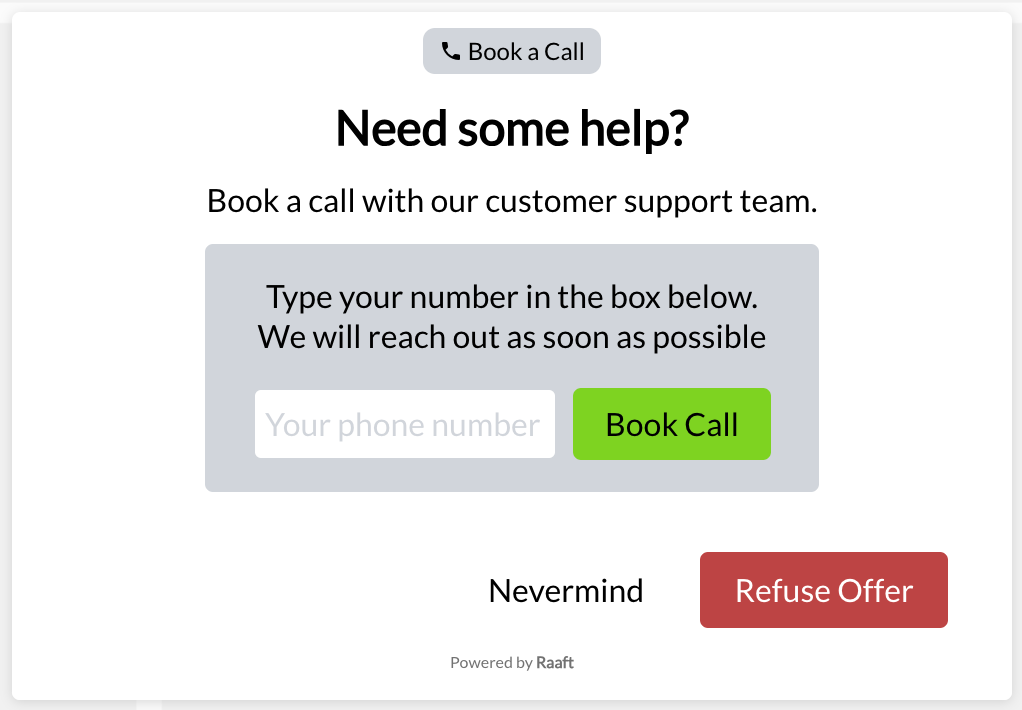
Call Me
You can offer the possibility of scheduling a phone call with your users with this offer type.
When a user accepts this offer, you’ll receive an email in your defined support email, warning that a user wants to make a phone, along with the details of the user and the phone number typed in the input field.
Feedback
The feedback step is simple but powerful. By giving your customers a place to voice their honest feedback as they leave, you can use their input to shape your future product.
This step lets you ask your customers for their feedback.
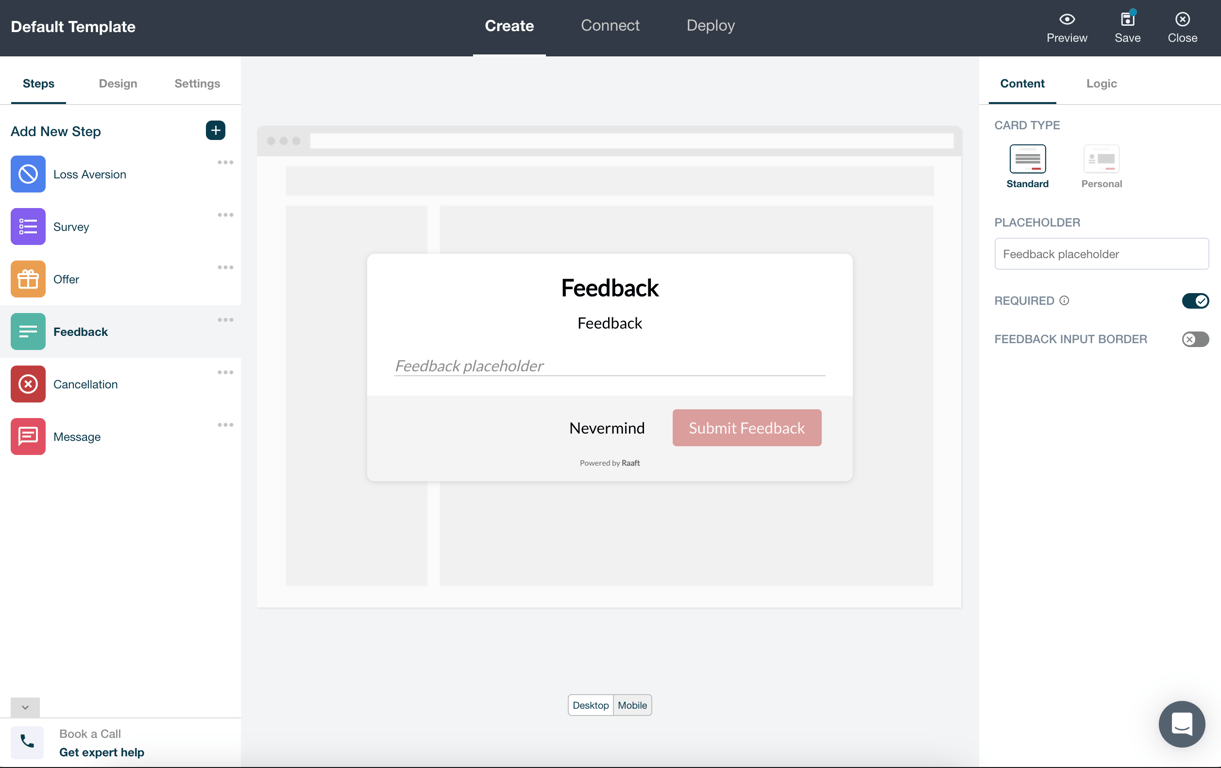
Feedback step’s customisation options include:
- setting the card type, with the same options of the Offer step
- setting a custom placeholder
- making this a required step, where the user has to type in at least 6 characters to be able to move to the next step
- change the feedback field between a one line field or a text area
Cancellation
Warning: This is where your customer’s subscription will be cancelled.
This is where you can remind them of cancellation logistics (losing access or storage) and customise your cancellation settings (immediately or at period end).
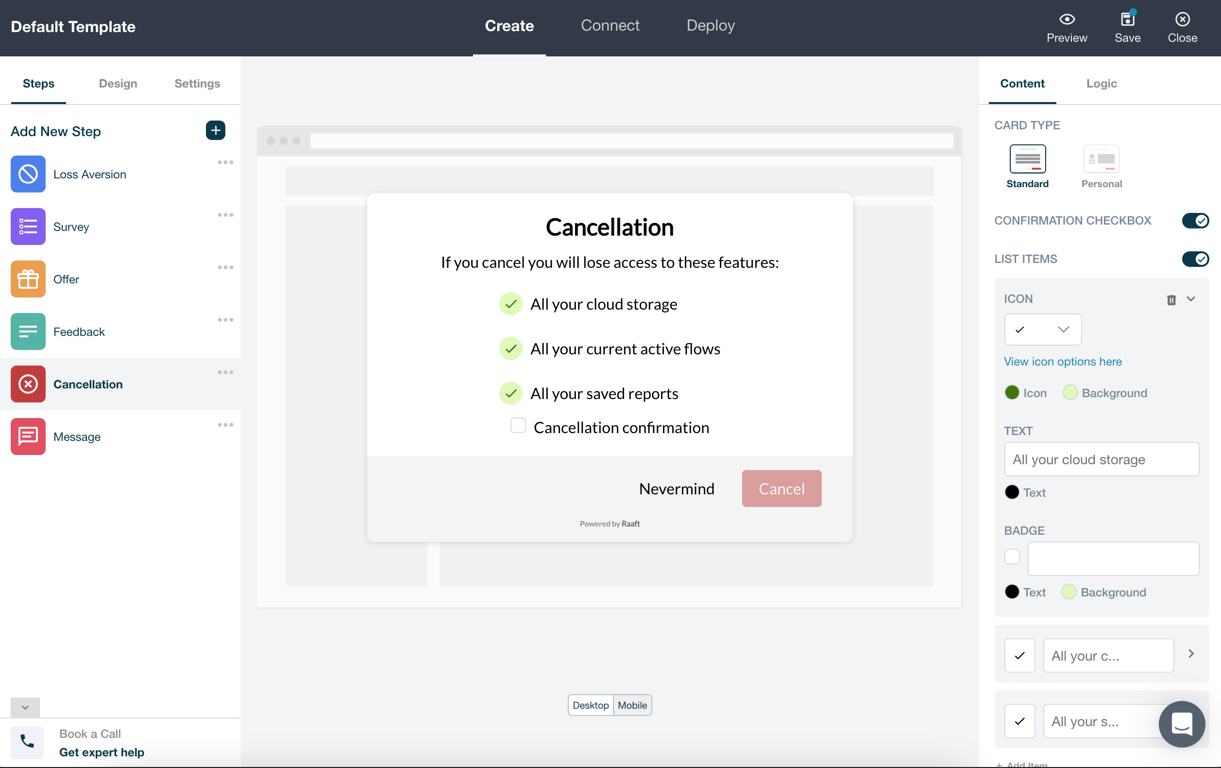
Additionally you can set a confirmation checkbox that the user has to check before proceeding with the cancellation.
When it comes to the customisation of the cancellation step:
- card type, with the same options of the Offer step
- list items, just like the Loss Aversion step
Message
The message step is where you can leave a final message to your customer
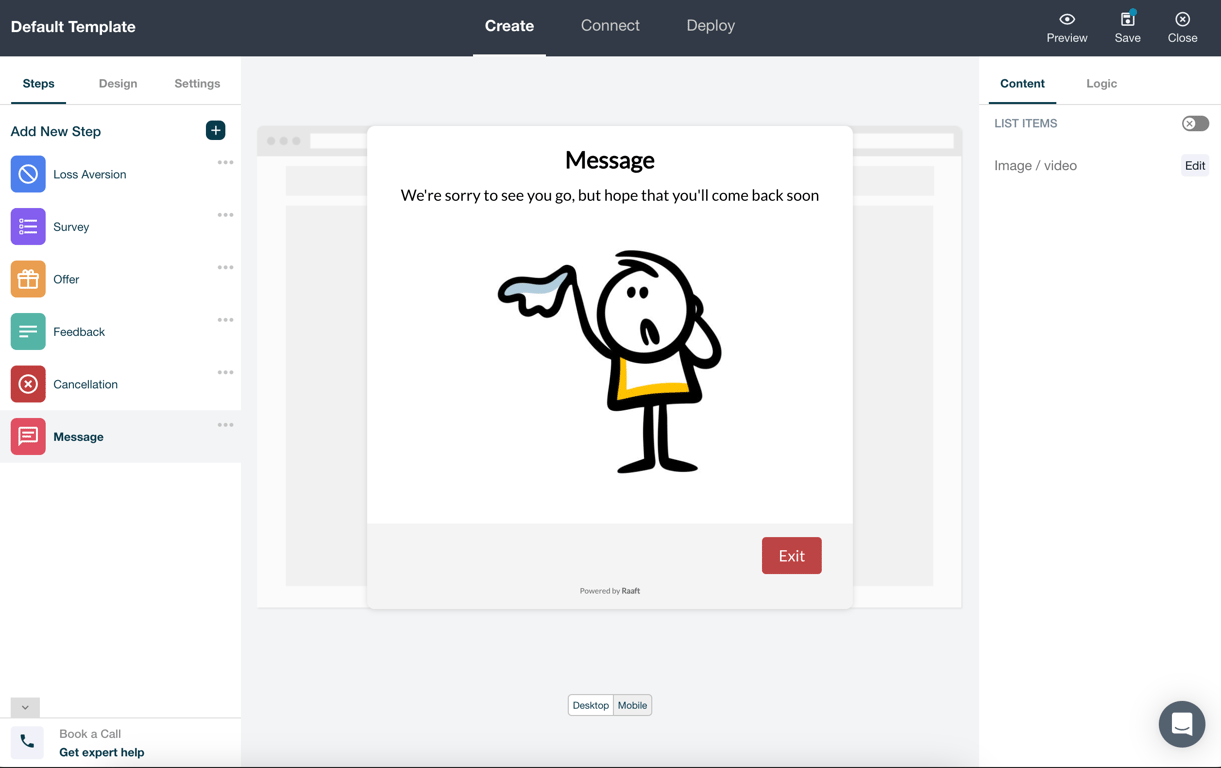
In this step you can add some elements of customisation:
- you can add a list of items (just like the Loss Aversion and the Cancellation steps)
- add an image or a youtube video
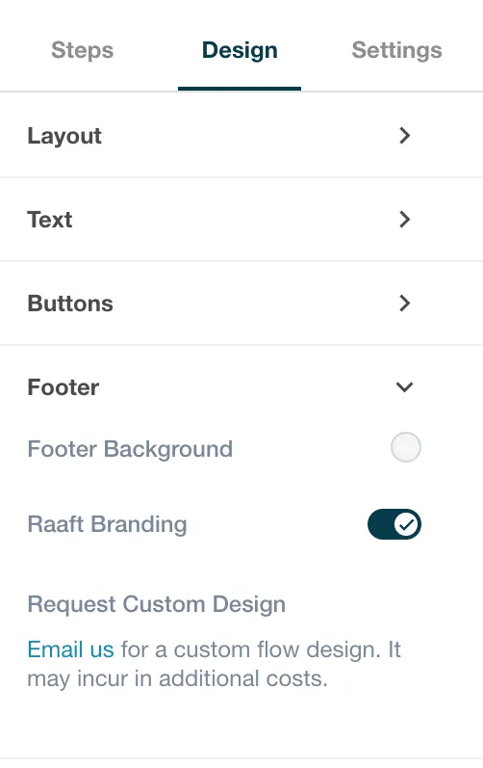
Design
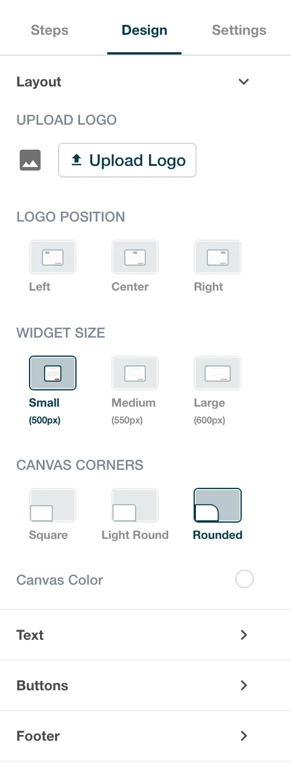
In the design step you can customise the width, fonts, colors, and button styles of your Retention Flow. You can also click through the modal preview the experience from your customer's perspective (for both desktop and mobile views).
In the design menu you can customise the overall appearance of the flow.
The menu is divided into four main sections.
Layout
- The layout section allows to add a logo to the top of the flow popup, and define its position as left, center or right
- allows to set the popup with between 500px, 550px and 600px
- let’s you define the style of the popup corners
- you can set the background colour of the popup
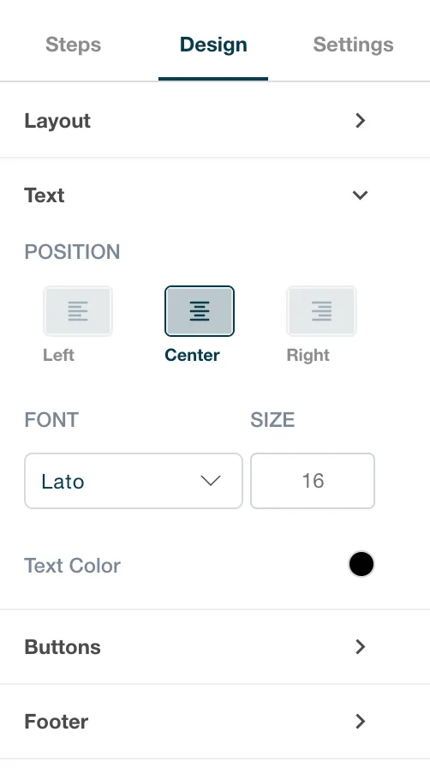
Text
- define the text position (left, center or right)
- choose the font family and size
- select the font colour
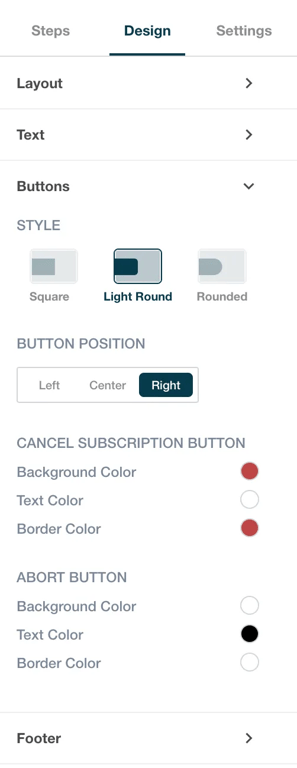
Buttons
- choose the buttons style by setting their corners to square, light round or rounded
- set the buttons position in the popup
- for each button you can define its background, border and text colours
Footer
- select a footer background
- if you’re using an account that is on a paid plan, you can add or remove Raaft’s branding
Settings
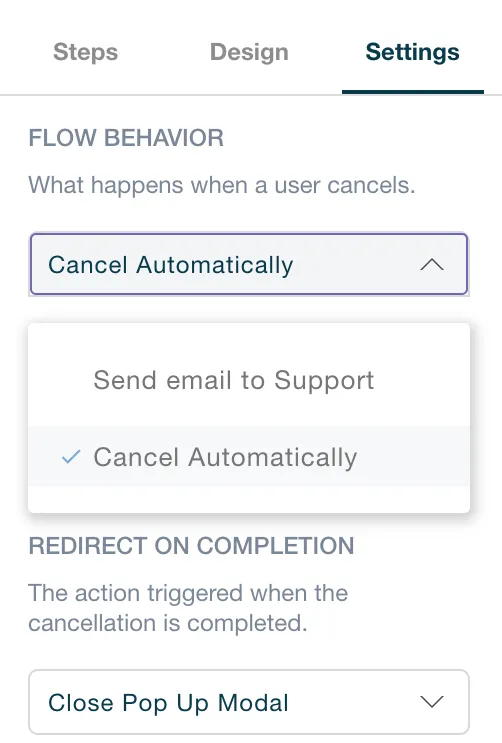
In the settings menu you can define the overall flow behaviour, such as what happens when the user exits the flow.
In the settings menu there are three main sections:
Flow Behaviour
In here you can select two options:
- Cancel Automatically. You can only select this option if you have a payment processor connected. This option means that we will handle all actions regarding your users subscriptions when they go through the flow. Such as, cancelling, applying coupon, changing plans and pausing subscriptions.
- Send email to Support. With this option selected, your defined support email will receive notifications when a user wishes to cancel.
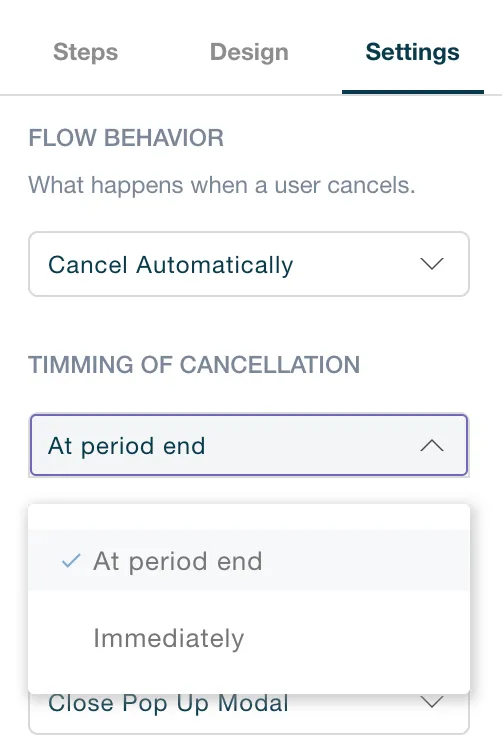
Timming of Cancellation
You can only use this menu if you have selected “Cancel Automatically” in the Flow Behaviour.
In here you have two options:
- At period end. This means that the subscription will only be cancelled at the end of the current billing period.
- Immediately. The subscription will be cancelled immediately.
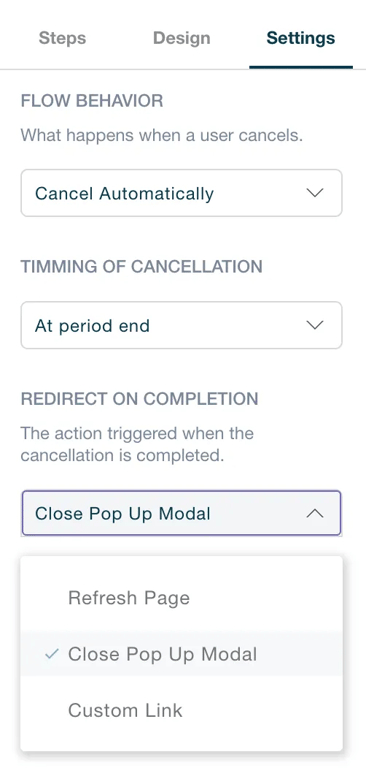
Redirect on Completion
In here you set the action to be performed when the user exits the flow:
- Refresh Page. The page the user was in when the flow was opened will be refreshed.
- Close Pop Up Modal. The flow pop up will be closed.
- Custom Link. The user will be redirected to a page of your choosing.
 Made with Bullet